A day ago, I realised I have amassed quite a lot of total upload views on my Youtube channel. The number, as of now, precisely is 30,598. Although that number is minuscule in comparison to other Youtube channels out there, it is still worth noting that it is 5 digits and looks quite nice if displayed on a website or a blog. I spent a few hours playing around with the Youtube API (version 2.0) and figured out a way to display the total upload views count of my Youtube channel. I am writing this tutorial for those of you who might be interested in displaying the statistic on their websites/blogs and I believe it will save you time. So here we go, let’s get started.
What are total upload views?
The answer to this question is quite simple. The total upload views is an accumulation of all the views your Youtube videos have received. In other words, the totalUploadViews statistic is the summation of all the total views of each of your Youtube channel uploads.
So lets say, you have three Youtube videos in your channel, with Video 1=300 views, Video 2= 450 views and Video 3= 100, the totalUploadViews statistic would show up as 850 views. You can often find the total upload views by going to your Youtube channel – it’s on the top right corner (see image below).
How do you display the total upload views count?
Right, you must be like, hey, cut the crap and tell me. Well, here it is. Thanks for being patient. So there are a couple of ways to achieve this. To be honest, my technique might not be the neatest, but it works quite well (gaze onto your right and see that social box showing my total upload views count).
I won’t make you read the Youtube Data API Protocol, but I’ll like to explain a few things I learnt. The Youtube Data API works like any other REST-based APIs you might have come across in the past. There are many languages that you can use with the API. We’ll use PHP.
The Youtube Data API has a reference guide (here) that defines the parameters used to request the data, including XML tags returned from an API response. There are all sorts of cools things that can be accessed from the Youtube Data API but we won’t go there. We are more interested in the <yt:statistics> tag.
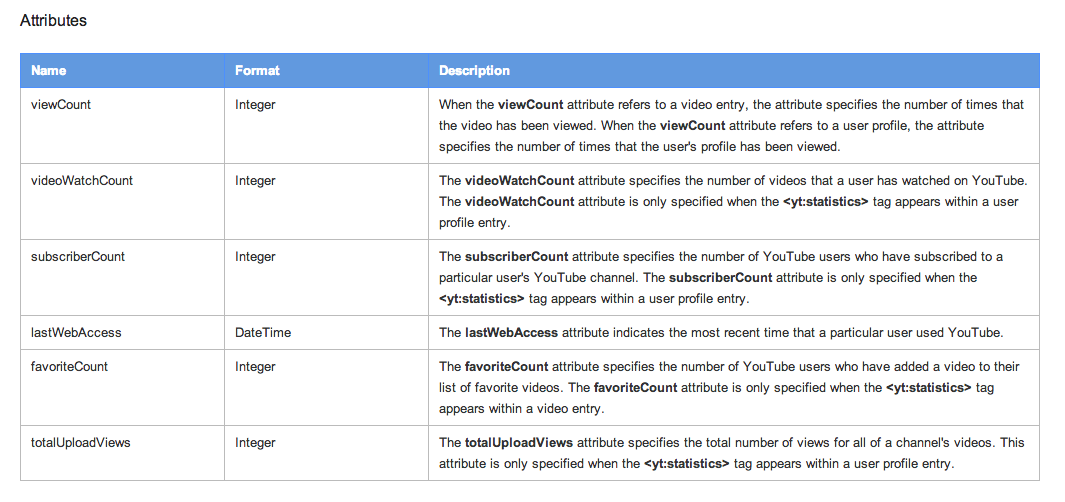
The <yt:statistics> tag provides statistics about a video or a user. There are multiple attributes associated with the tag as you might already have guessed. There are subscriber count, total upload views count and loads of others. Here is a snap shot from the Google Developers website stating all the attributes you can access for this statistics tag.
 This tutorial’s purpose is to show you how to access and display the totalUploadViews attribute of the <yt:statistics> tag. But before that, let’s look at a very interesting URL that, when accessed, responds with a lot of XML data from Youtube’s Data API.
https://gdata.youtube.com/feeds/api/users/aligajani?v=2.0 (My Channel)
https://gdata.youtube.com/feeds/api/users/username?v=2.0 (Replace username with yours)
This is the URL. You can actually copy and paste this in your browser and it will show you a lot of data about my channel. If you replace the username with your own channel name, it will respond with the data about your Youtube channel. It’s pretty cool. To our interest is the particular line from the XML response and this is shown below:
<yt:statistics lastWebAccess=’2012-03-27T20:13:07.000Z’ subscriberCount=’8′ videoWatchCount=’0′ viewCount=’980′ totalUploadViews=’30598’/>
The <yt:statistics> tag has a lot of attributes such as viewCount(times your channel has been viewed) to totalUploadViews(the number of views all your uploaded videos have received to date).
What’s the code?
The code to access and display the totalUploadViews is just a few lines. And you’re done.
1 2 3 4 5 6 7 8 | <?php $ytusr = "replace_with_your_username"; $xdoc = new DomDocument; $xdoc->Load('http://gdata.youtube.com/feeds/api/users/'.$ytusr.''); $ytstat = $xdoc->getElementsByTagName('statistics')->item(0); $total_views_yt = $ytstat->getAttribute(totalUploadViews); echo number_format($total_views_yt); ?> |
If you have any questions and suggestions for tutorials, just comment below. I hope this tutorial was helpful and if it wasn’t, let me know in the comments section below and I’ll try to take your valuable input into consideration. Thanks again and sorry if it was long, but I like explaining a few things and I like to keep it that way (Y).
About Ali Gajani
Hi. I am Ali Gajani. I started Mr. Geek in early 2012 as a result of my growing enthusiasm and passion for technology. I love sharing my knowledge and helping out the community by creating useful, engaging and compelling content. If you want to write for Mr. Geek, just PM me on my Facebook profile.


