A friend of mine had built a customized WordPress site on her localhost. But she had a problem? The process of migrating or moving her WordPress site from localhost to a live web server seemed quite trivial. I was called in to help and learnt quite a lot. Today’s tutorial draws on my experience from yesterday. This is solely for the benefit of others in the WordPress community. I am sure this guide would be of assistance to anyone who is looking to get their local WordPress site up on a web server in no time.
Background
Migrating, transferring or moving a WordPress installation from a localhost to a web server can be a difficult process for newbies. There are many things that you need to consider during the migration process. For example, you need to export and import SQL files, copy and paste the WordPress folder into your FTP, find and replace links and much more. With this tutorial, you are going to find the whole process seamless. Let’s get started.
Information Required
You need the following pieces of information before you proceed with this tutorial. The information required is:
- Hostname (e.g. yourwebsite.com)
- cPanel Username
- cPanel Password
- FTP Username
- FTP Password
Exporting the SQL file
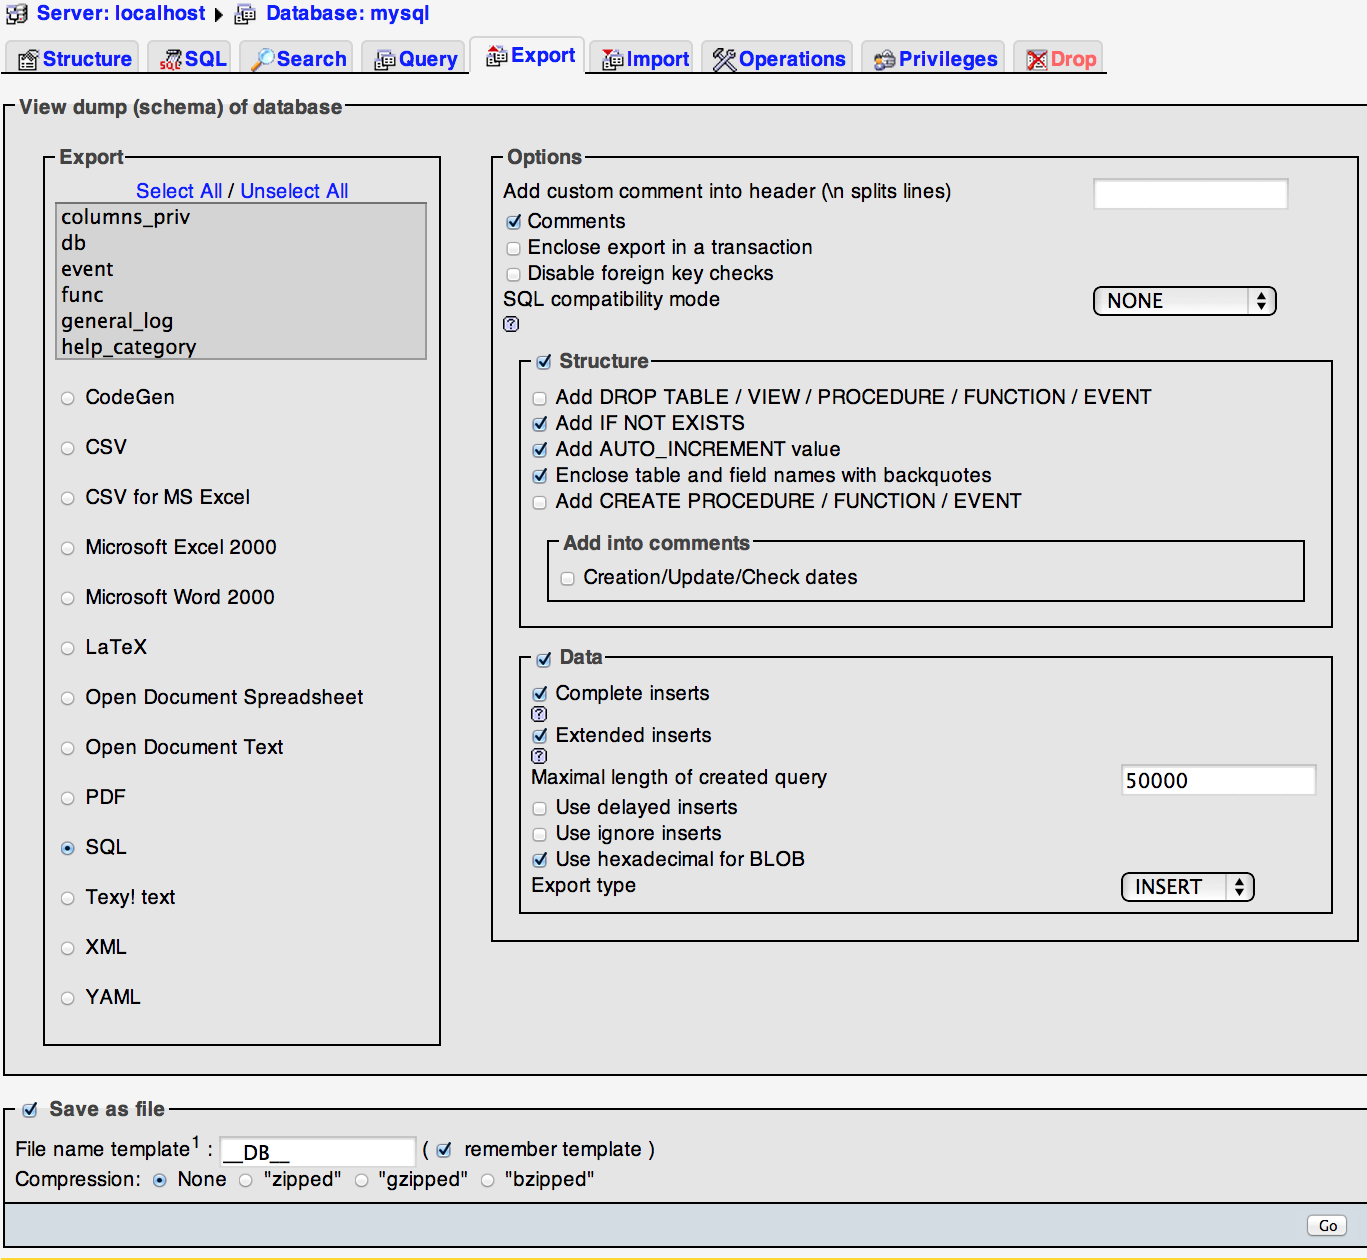
At first, you need to export the WordPress SQL file from the phpMyAdmin in your localhost. To do this, you have to enable the XAMPP on your machine. Then, open up your favorite browser and type in 127.0.0.1. This will bring up the XAMPP index page. Navigate to the left hand sidebar and click phpMyAdmin. Alternatively, you can use this URL: http://127.0.0.1/phpmyadmin/. Now, once you are inside phpMyAdmin, click the WordPress database that you would have created earlier. Once that’s done, click the Export tab. See the image below to ensure the settings are perfectly fine. Then, simply click the Go button on the bottom right corner of the page to download the automatically generated .SQL file. Store it on your Desktop for now.
Changing the URLs in the SQL file
If you aren’t already aware of this, the SQL file you just exported has database values that contain links that look like this “http://localhost/wordpress/..”. You wouldn’t want that if your WordPress’ final destination is a live web server which has an address that looks something like this “http://yourwebsite.com/wordpress/..”. This would simply not work. Luckily, the solution is easier than you think. But before showing you the workaround, you need two things.
- Sublime Text 2, which you can download from here.
- Make a final decision regarding the location of your WordPress site. If it’s going to be accessed at “http://yourwebsite.com/wordpress/” then stay with it because you wouldn’t want to make the hassle of changing things all over again. Take a glass of water and make a decision first.
Now, what we will try to do is use Sublime Text 2′s Find and Replace All function to replace the text ”http://localhost/” with “http://yourwebsite.com/wordpress/”. You can access Sublime Text 2′s Find and Replace all function by going to Find > Replace. This will change the old text with the desired one by finding and replacing all of its occurrences in the SQL file. Once you have finished this step, save the file again and keep it in a safe place.
Creating the Database on your Host
Most of the popular hosting companies (like Hostgator, Bluehost and others) provide you with a system called cPanel that allows you manage your hosting account. Log in to your website’s cPanel by going to http://yourwebsite:2082 and click the MySQL Database Wizard. Create your fresh WordPress database by adding in the required Database name, username, password. You will be needing this information at a later stage. This step should be a breeze as it hardly takes less than 2 minutes to complete.
Importing the SQL file
To import your SQL file (the one you stored on the desktop before and modified using Sublime Text 2), go to your cPanel again and click the phpMyAdmin link by scrolling down a little. Once clicked, you would be taken to the phpMyAdmin on the web server (yes, it looks like the same on on a localhost). On the left hand side, you would be presented with a list of all the databases on your hosting account. Click the database you created for WordPress earlier and then click the Import tab. Now, you would be taken to the Import section where you can import the SQL file. To do that, click the “Choose File” button and select the SQL file from your desktop (or wherever you stored it). Once done, click the grey “Go” button below. If all goes well, you would be presented with a green success message saying the SQL import was successful. Voila.
Copying the WordPress Folder to FTP
A lot has been done till now. It’s time to give a final push. To do that, you would need to copy the WordPress folder from your localhost to your FTP. The FTP gives you access to your web server’s folder where keeping anything there makes it available to the general public. Using your favorite FTP client (we recommend FileZilla), login into your web server’s FTP account by using the following information: hostname like yourwebsite.com, username and password. You might already have the account information, so it shouldn’t be a problem whatsoever. Copy the WordPress folder from your localhost, as it is, into your public_html. This would make your website accessible at http://yourwebsite.com/wordpress/. Once that’s done, proceed to the next step.
Connecting your WordPress with the Database
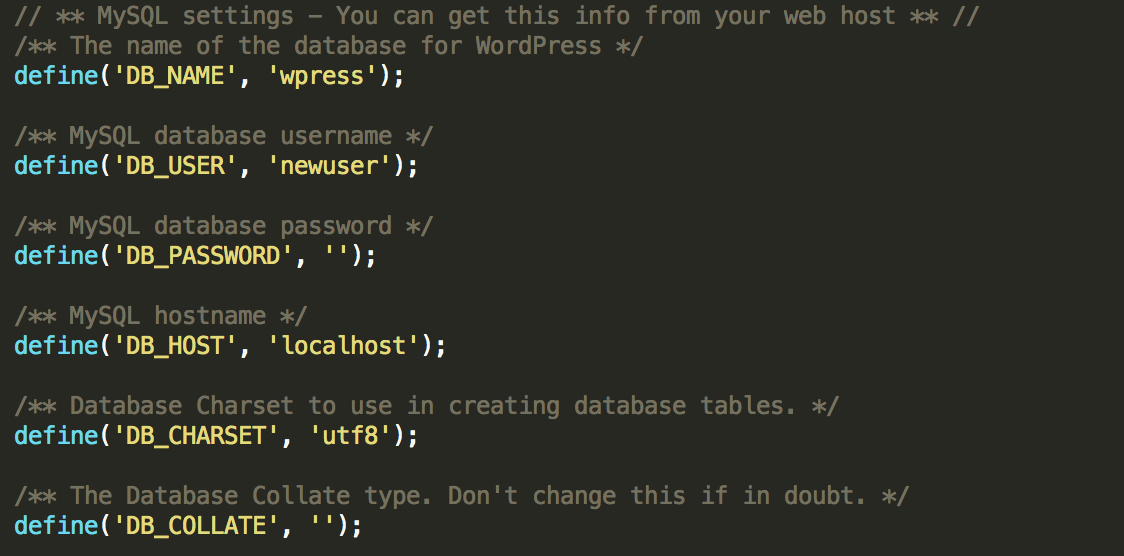
You still need to connect your WordPress with your database so it can communicate. At this point in time, your WordPress’s configuration is still set to localhost settings, and that needs to be changed. To do this, go into your WordPress’s root folder inside your web server (public_html > wordpress) and edit the file wp-config.php. This would allow you to update 3 key pieces of information, namely: DB_NAME, DB_USER, DB_PASSWORD. You might have these 3 pieces of information already from the earlier exercise where you were asked to create a database on your web server using cPanel. Here’s a much needed visual. You just need to update the top 3 lines, only. Leave the rest as it is. Save the wp-config.php file again (overwrite it).
Accessing your WordPress Dashboard
Now, hoping you did everything right as shown in this tutorial, you should be able to access your WordPress site. It will be exactly the same thing as it was on a localhost, but the only difference here is that your site is now migrated to a live web server, where you can edit and demo it to your client. To access your WordPress site, go to http://yourwebsite.com/wordpress. If your site looks the same as it was on your local machine, you’ve done a marvelous job and kudos to you for that. Now, let’s access the dashboard by going to http://yourwebsite.com/wordpress/wp-admin. Plug in your username and password and if the dashboard shows up without any glitches, the job is well done!
About Ali Gajani
Hi. I am Ali Gajani. I started Mr. Geek in early 2012 as a result of my growing enthusiasm and passion for technology. I love sharing my knowledge and helping out the community by creating useful, engaging and compelling content. If you want to write for Mr. Geek, just PM me on my Facebook profile.


