Ruby on Rails is a full stack web development framework developed by David Heinemeier Hansson. David is a partner at 37 signals, creators of Basecamp, Highrise and Campfire. The framework was built upon the Ruby language developed by Yukihiro “Matz” Matsumoto in the mid 90’s. The framework has been further developed since it’s original release and is currently based upon Ruby 1.9.3 and Rails 3.2.11.
So why does Ruby on Rails Rock?
Ruby on Rails is an open source framework with lots of people contributing to the community and creating gem files (packages that speedup development). It follows DRY (Don’t Repeat Yourself) and Restful practices and favors convention over configuration.
Who uses Ruby on Rails?
Twitter, Groupon, Spotify, Shopify, Yellow Pages, Github.
What will you learn from following this tutorial?
This tutorial will take you through the steps necessary for installing Ruby on Rails from scratch. We will show you how to get the latest release on the Windows or Mac OS X operating systems.
There are many ways to install Ruby on Rails on Windows or OS X platforms, from compiling the source to using an installer. Instead of going through step by step, I will point you in the right direction to get you up and running.
After completing the install of Rails, we will start creating a basic blogging application and build upon it in the subsequent tutorials.
Installing on Windows
In my own opinion, I would recommend using Rails Installer for Windows, as natively users of this platform are usually well used to installing executables rather than compiling from the command line. It is a breeze to setup and will allow you to create your first basic application within minutes of finishing the install.
Download Windows Rails Installer here.
Installing on OS X
There are lots of ways to install the framework on OS X: Rails Installer as above, from source, RVM (Ruby Version Manager, this is an extremely handy way if you want to use multiple versions of Ruby and Rails), RBENV (again this is similar to RVM where you can use multiple versions of Ruby and Rails).
One prerequisite of installing on OS X would be to install XCode Command Line Tools or the OSX GCC Installer; basically this will enable you to compile from pre-built binary packages which is essential if you are compiling from source, using RVM or RBENV.
- Rails Installer for OS X 10.7 / 10.8 can be downloaded here.
- RVM can be installed from here.
- RBENV is available here.
- XCode Command Line Tools is available here.
- OS X GCC Installer is available here.
Ok, since we have covered different methods of installing Ruby on Rails, lets go ahead and install RVM on OSX.
Firstly install the OS X GCC package file from the link above; this file is 286Mb so it may take a little while. Once it has downloaded, follow the on screen instructions to install.
Now we have GCC installed, so lets go ahead and open terminal and run the following command to get RVM up and running.
\curl -L https://get.rvm.io | bash -s stable –rails
This will take a while to run but will get everything you need to start developing in Ruby on Rails; it will install the latest stable versions of Ruby and Rails.
If you want to check what versions you are running, then you can issue the following commands within Terminal:-
The results will vary depending on what the latest release is when you are following this tutorial.
Check RVM version
rvm –v
Result
rvm 1.17.8 (stable) by Wayne E. Seguin <wayneeseguin@gmail.com>, Michal Papis <mpapis@gmail.com> [https://rvm.io/]
Check Ruby version
Ruby -v
Result
ruby 1.9.2p290 (2011-07-09 revision 32553) [x86_64-darwin11.2.0]
Check Rails version
Rails –v
Result
Rails 3.2.11
Hopefully by now you should have a fully working setup, which will allow you to get started with the coding tutorial regardless if you are running Windows or OS X.
Which Editor to use?
An important choice to make is what Editor to use for coding Rails applications. There are many choices, but some of these are operating system dependent.
Here is a brief list of Editors for Windows and OS X.
Windows
- Sublime Text 2 – http://www.sublimetext.com
- RedCar – http://redcareditor.com/
- Notpad ++ – http://notepad-plus-plus.org/
- Komodo Edit – http://www.activestate.com/komodo-edit
- Editra – http://editra.org/
- Netbeans – http://netbeans.org/features/ruby/index.html
- Rubymine – http://www.jetbrains.com/ruby/
OS X
- Sublime Text 2 – http://www.sublimetext.com
- Coda 2 – http://panic.com/coda/
- Textmate – http://macromates.com/
- Aptana Studio – http://www.aptana.com
- Rubymine – http://www.jetbrains.com/ruby/
- Netbeans – http://netbeans.org/features/ruby/index.html
- RedCar – http://redcareditor.com/
- Vim – http://www.vim.org
As with any programing languages there are many editors. I have mentioned the main editors but there are plenty more out there and I suggest you use what you feel most comfortable with.
For this tutorial I am using Mac OS X 10.8 Mountain Lion, RVM (Ruby 1.9.3 – Rails 3.2.11) and Sublime Text 2 as my editor.
The Blogging Application
Now that we have Ruby on Rails installed on your system, it is time to get our hands dirty and start coding.
The application itself will start off as a simple blogging system with categories and articles. I plan to cover authentication, tagging and comments in future articles.
The first step is to create a folder on your disk to house your Rails applications; this can be anywhere you wish.
Ok lets go ahead and open terminal or command prompt is you are using Windows and CD into the desired directory.
Once you are at the correct location on your disk then run the following command.
rails new blog
This will setup the new rails application and return the following (This is just showing the directory structure that Rails framework sets up as standard) :
      create
      create  README.rdoc
      create  Rakefile
      create  config.ru
      create  .gitignore
      create  Gemfile
      create  app
      create  app/assets/images/rails.png
      create  app/assets/javascripts/application.js
      create  app/assets/stylesheets/application.css
      create  app/controllers/application_controller.rb
      create  app/helpers/application_helper.rb
      create  app/mailers
      create  app/models
      create  app/views/layouts/application.html.erb
      create  app/mailers/.gitkeep
      create  app/models/.gitkeep
      create  config
      create  config/routes.rb
      create  config/application.rb
      create  config/environment.rb
      create  config/environments
      create  config/environments/development.rb
      create  config/environments/production.rb
      create  config/environments/test.rb
      create  config/initializers
      create  config/initializers/backtrace_silencers.rb
      create  config/initializers/inflections.rb
      create  config/initializers/mime_types.rb
      create  config/initializers/secret_token.rb
      create  config/initializers/session_store.rb
      create  config/initializers/wrap_parameters.rb
      create  config/locales
      create  config/locales/en.yml
      create  config/boot.rb
      create  config/database.yml
      create  db
      create  db/seeds.rb
      create  doc
      create  doc/README_FOR_APP
      create  lib
      create  lib/tasks
      create  lib/tasks/.gitkeep
      create  lib/assets
      create  lib/assets/.gitkeep
      create  log
      create  log/.gitkeep
      create  public
      create  public/404.html
      create  public/422.html
      create  public/500.html
      create  public/favicon.ico
      create  public/index.html
      create  public/robots.txt
      create  script
      create  script/rails
      create  test/fixtures
      create  test/fixtures/.gitkeep
      create  test/functional
      create  test/functional/.gitkeep
      create  test/integration
      create  test/integration/.gitkeep
      create  test/unit
      create  test/unit/.gitkeep
      create  test/performance/browsing_test.rb
      create  test/test_helper.rb
      create  tmp/cache
      create  tmp/cache/assets
      create  vendor/assets/javascripts
      create  vendor/assets/javascripts/.gitkeep
      create  vendor/assets/stylesheets
      create  vendor/assets/stylesheets/.gitkeep
      create  vendor/plugins
      create  vendor/plugins/.gitkeep
         run  bundle install
A very important part of the code above is run bundle install. Basically this makes sure that all of the dependencies of the project are installed. To read more about bundler then check out http://gembundler.com.
Ok, now that the project is setup, we will now CD into this directory so that we can get started.
cd blog
To test whether the application is working we will now start the web server, by default Rails uses a built in webserver called Webrick and we can start it up using:
rails server
There are lots of short rails commands so if you like you can just issue the rails s command as Rails will interoperate this as rails server.
Once the webserver is running, open your browser of choice and navigate to http://localhost:3000. This is the default address that Webrick uses. If you want to use a different port rather than the default 3000, then you can use the -p#### command at the end of rails s, for instance rails s –p4000 and then you can navigate to http://localhost:4000.
In your browser you should see the following webpage:
Now that we have this page up, we can see that everything is working as it should. This file is situated in /public/index.html and is the default page of the web application. Later on we will be deleting this file and re-routing the homepage to a different file.
To close down the webserver at anytime just use the keys ctrl + c.
Before you start any application in any server side language, it is important to specify what the application will do and how the data will be stored in the database. Now many experienced developers will hold this information in their head and just go with the flow, but for this example I will go through a brief specification of what we are expecting to get out of the application in this tutorial.
Capability
Allow the user to create, read, update and destroy (CRUD) blog posts and assign them to a specific category.
Database Architecture
The database will contain the following tables:
Rails as a framework makes it very easy for rapid development of CRUD pages through something called Scaffolding. Scaffolding will prepare the Model, View Controller (MVC) pages and methods for our blog application by issuing the following command in terminal:
rails generate scaffold article title:string content:text category_id:integer
Lets break the command down so that we understand it:
rails generate
This command is instructing rails to use a built in generator.
scaffold
This command is telling rails that you want to creat CRUD pages through Scaffolding.
article
This is the table element name.
title:string content:text category_id:integer
These are the field names and type of fields to be created.
Once you have run the command you should see the following message:
invoke  active_record
      create    db/migrate/20130114130256_create_articles.rb
      create    app/models/article.rb
      invoke    test_unit
      create      test/unit/article_test.rb
      create      test/fixtures/articles.yml
      invoke  resource_route
       route    resources :articles
      invoke  scaffold_controller
      create    app/controllers/articles_controller.rb
      invoke    erb
      create      app/views/articles
      create      app/views/articles/index.html.erb
      create      app/views/articles/edit.html.erb
      create      app/views/articles/show.html.erb
      create      app/views/articles/new.html.erb
      create      app/views/articles/_form.html.erb
      invoke    test_unit
      create      test/functional/articles_controller_test.rb
      invoke    helper
      create      app/helpers/articles_helper.rb
      invoke      test_unit
      create        test/unit/helpers/articles_helper_test.rb
      invoke  assets
      invoke    coffee
      create      app/assets/javascripts/articles.js.coffee
      invoke    scss
      create      app/assets/stylesheets/articles.css.scss
      invoke  scss
      create    app/assets/stylesheets/scaffolds.css.scss
Again this is telling you what the command created for you.
A very important part of the command is the migration file that it creates. This basically is an instruction of the database fields to set up.
create db/migrate/20130114130256_create_articles.rb
Lets take a look at the file.
class CreateArticles < ActiveRecord::Migration
  def change
    create_table :articles do |t|
      t.string :title
      t.text :content
      t.integer :category_id

      t.timestamps
    end
  end
end
At this point the database and table have not been created, so we need to issue another command to do so. This command uses something called Rake. This command has many uses and I would encourage you to read about it at http://guides.rubyonrails.org at some stage.
In terminal issue the following command to create the Article table:
rake db:migrate
With any successful migrations you should be notified that it was created like the following:
==  CreateArticles: migrating =================================================
-- create_table(:articles)
   -> 0.0011s
==  CreateArticles: migrated (0.0012s) ========================================
Now we are at a point that we can check out what the scaffold has setup for us. So start Webrick up by issuing the short following command in terminal:
rails s
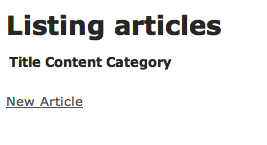
Now open your browser and navigate to http://localhost:3000/articles. This will open up the application at the index page of the Article’s CRUD pages.
If you remember we called the table “article” and rails has now changed it in the URL to “articles”, this is a built in rails function that pluralizes tables names in it’s URL’s so you know for future reference when trying to find your pages.
Below is a screen shot of what you should see:
Go ahead and click on the “New Article Link” and you should see the following:
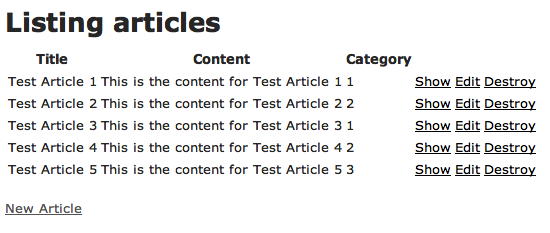
Now input a few test articles and you should end up with an index page like below:
Now is a good time to go ahead and try out the rest of the CRUD system and edit and delete some posts.
You can now quit the server with ctrl + c
Ok we now have a working CRUD in place for a basic blog system, but we cant assign the categories as the table is not setup and there is no way of selecting from a dropdown in the form. Lets address this issue now by running the following commands.
rails generate scaffold category name:string
Tip: we could even shorten the command we just ran like so:
rails g scaffold category name
rails excepts “g” for “generate” in this and many other commands, and we have also dropped the field type from “name” as in Rails 3 and above Rails assumes that a field is a string if you do not pass it a type.
After you have run the scaffold command don’t forget we need to run the migration with rake db:migrate in order for rails to create the necessary tables in the database.
Now restart the rails server with rails s.
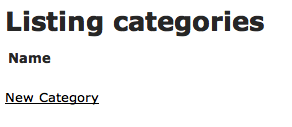
As before you can now navigate in your browser to http://localhost:3000/categories. You should now see the index page for categories.
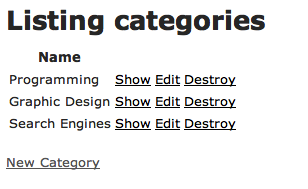
Lets go ahead and create a few categories.
As the database structure is of a relational type, meaning categories belong to many articles, we need to tell rails that this is the case. We do this in the Model part of the MVC system as follows:
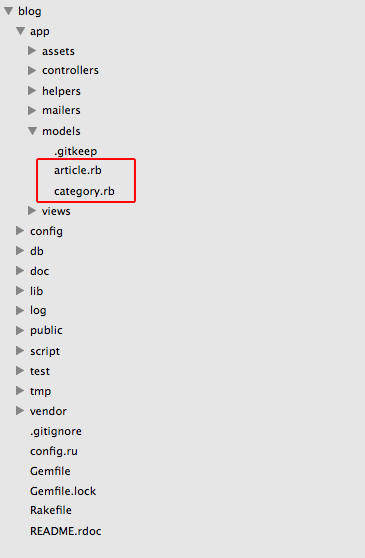
Open up the following pages in your editor of choice – article.rb and category.rb (the .rb file extention stands for ruby). These files can be found in the “app/models” directory.
You need to add belongs_to :category to the article.rb file so that it looks like:
class Article < ActiveRecord::Base
  attr_accessible :category_id, :content, :title

  belongs_to :category
end
And you need to add has_many :articles to the category.rb file so that it looks like:
class Category < ActiveRecord::Base
  attr_accessible :name

  has_many :articles
end
Changing these files to the above is telling Rails that there is a link between the 2 tables in the database.
Now it is time to create the drop down in the articles page to enable us to choose to which category the given article belongs.
Open up the file _form.html.erb situated in the “app/views/article/” directory which should look like the following:
<%= form_for(@article) do |f| %>
  <% if @article.errors.any? %>
    <div id="error_explanation">
      <h2><%= pluralize(@article.errors.count, "error") %> prohibited this article from being saved:</h2>

      <ul>
      <% @article.errors.full_messages.each do |msg| %>
        <li><%= msg %></li>
      <% end %>
      </ul>
    </div>
  <% end %>

  <div class="field">
    <%= f.label :title %><br />
    <%= f.text_field :title %>
  </div>
  <div class="field">
    <%= f.label :content %><br />
    <%= f.text_area :content %>
  </div>
  <div class="field">
    <%= f.label :category_id %><br />
    <%= f.number_field :category_id %>
  </div>
  <div class="actions">
    <%= f.submit %>
  </div>
<% end %>
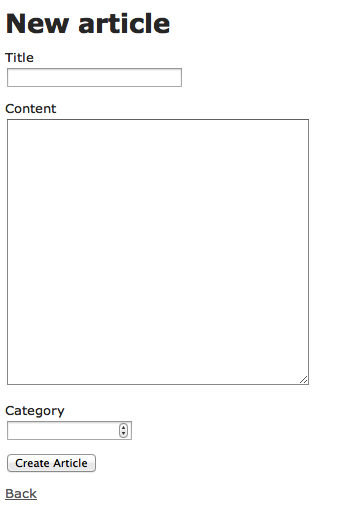
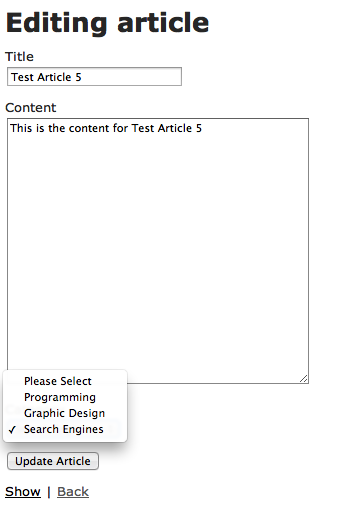
Now edit the line above <%= f.number_field :category_id %> to <%= collection_select(:article, :category_id, Category.all, :id, :name, {:include_blank => ‘Please Select’})%>. This will populate a dropdown with all of the categories which you added through the CRUD system.
Note: This form is a kind of include so it is used in the create and update forms and therefore only needs to be changed in the _form.html.erb file.
Below is how the article form should look after we have added the dropdown code to the form.
Now we can route the application to the articles index and remove the index.html that displays the default “Welcome Aboard” message as I mentioned earlier on in the tutorial. You can achieve this either by navigating to the public folder in finder/explorer and deleting the file of issuing the following command in terminal:
rm public/index.html
Once you have removed the file you can open up the “config/routes.rb” file in your editor and add root :to => ‘articles#index’in to the file which will instruct rails that it is the root of the application.
The file routes.rb should now look like this:
Blog::Application.routes.draw do

  root :to => 'articles#index'

  resources :categories

  resources :articles

  #lots of commented out code

end
If you now start up the rails server and open http://localhost:3000 it should now open up the articles index.
In future episodes I am hoping to deal with the following aspects of a real world blogging application that will expand upon this tutorial:
- Authentication
- Static pages
- Navigation
- Commenting on articles
- Tagging articles
- Twitter Bootstrap Theming
Recommended Resources
- The official Ruby On Rails website – http://rubyonrails.org
- Rails for Zombies from Code School – http://railsforzombies.org
- Learn Rails by Example (Second Edition) by Michael Hartl – http://ruby.railstutorial.org/ruby-on-rails-tutorial-book (I would recommend buying the paperback as it is an awesome resource)
- Railscasts by Ryan Bates – http://railscasts.com (free and subscription based tutorials)
- Stack Overflow – Never be afraid to ask for help, Stack Overflow has saved me from pulling out the hair I have left many of times J – http://stackoverflow.com
About Robbie Done
Robbie Done is a British Web Developer. He is an experienced Software Developer, with over 2 decades of industry exposure.






Pingback: Quora()
Pingback: Getting Started with Ruby on Rails | Part 2 of Series | Authentication - Mr. Geek()